How to Create an SLA
- Go to Settings | Incident Management | SLA

- Click on the blue plus icon

- Give the SLA a meaningful name
- Add a description for the SLA (optional)
- Click ON to enable the SLA

- Select the condition you would like to use for the SLA 6.1 Match any ticket regardless of the conditions = The SLA will be applied to all tickets 6.2 Match all of the conditions = The SLA will only be applied once all the conditions are met 6.3 Match any of the conditions = The SLA will be applied if any of the conditions are met
- Select the blue add a condition box to setup a condition to be met
Note: Conditions work on an IF Then statement structure

- Set the respective respond within time and resolve within time for each priority in your SLA

- Set any exceptions you would like applied to your SLA (optional)
Note: When (re)calculating a tickets due time, time spent in these extended statuses are considered as paused

-
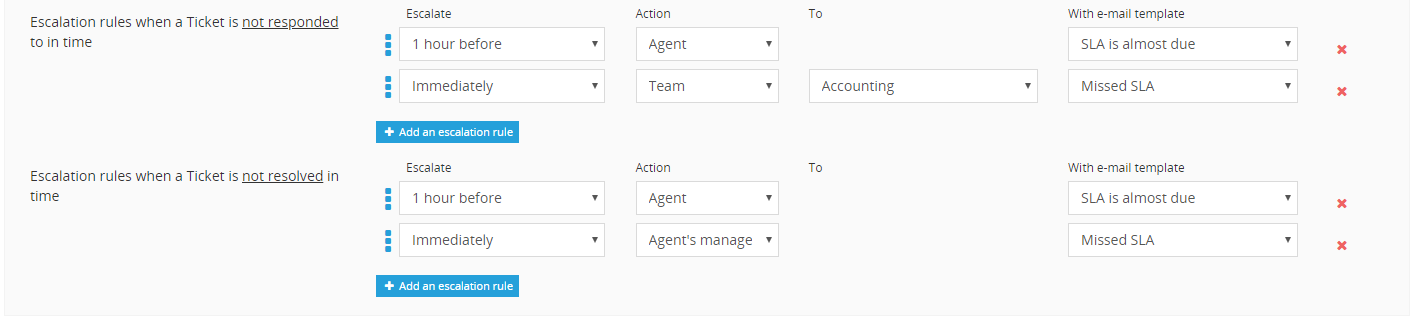
Configure your escalation rules for when a ticket is not responded to in time 10.1 Escalate = the amount of time before or after an SLA is due 10.2 Action = the action taken once the escalation time has arrived 10.3 To = the agent or team where the escalation is being sent 10.4 with email template = the email template to be sent to the agent or team
-
Configure your escalation rule for when a ticket is Not resolved in time 11.1 Escalate = the amount of time before or after an SLA is due 11.2 Action = the action taken once the escalation time has arrived 11.3 To = the agent or team where the escalation is being sent 11.4 with email template = the email template to be sent to the agent or team
How to create an SLA video tutorial
